Showing posts with label tips. Show all posts

Thursday, January 9, 2014

No Reply Blogger Issues

Hey everyone. I'm so sorry if I've commented on your blogs and it showed I was a no-reply blogger. Apparently when I switched my account from Blogger to Google+ a while ago it changed my setting. I didn't know this until this morning when I received an email from Molli Sparkles. I have to admit I went all fan girl and did a little happy dance and squealed because I got an email from him. 

Well, it took me a little bit, but I found a way to fix my no-reply blogger issue. So I recommend checking to see if you are a no-reply blogger too. Simply post a comment to one of your blog posts and try to reply to it in your email. If you are, check out Fluster Buster's fix. Just click on the image below.


Wednesday, September 7, 2011

Churn Dash Tutorial

Let's make some butter today!

(Special Thanks to Jan from Sew Sow In Love for getting that "code" stuck in my head today on Twitter!)

Ok today I am going to teach you all to make butter (the Churn Dash quilt block that is).

Tools:
* Acrylic Rulers: I used a 2-1/2" square, 2-1/2" x 16" rectangle, and a 4-1/2" square.
* Sewing machine
* Neutral Thread: I use Aurifil #2000
* Rotary cutter and mat
* Iron and Ironing board

Ingredients needed:
* Scraps from 2 different fabrics (see measurements below for amount needed).

I am using 1800s Civil War Reproduction fabric in blue (background) and red (focus).

Let's get Churning!

Step 1: Press fabric to get the wringkles or creases out.

Step 2: Cut fabric. Remember measure twice, cut once!

From blue fabric: (1) 2-1/2" square, (1) 1-1/2" x 12" strip, (2) 2-7/8" squares.
From red fabric: (1) 1-1/2" x 12" strip and (2) 2-7/8" squares.

(I'm missing my 2-1/2" square of blue fabric in the above picture. I had forgotten to cut it out when I took it.)

Step 3: Draw a diagonal line on the blue (lighter fabric) fabric.


Step 4: Place one blue square on top of one red square and repeat with the other squares. Also place the strips on top of each other.


Step 5: Sew 1/4" along one long side of the strips. Sew 1/4" on each side of the drawn lines on the squares. After you have sewn the seams for the squares, cut down the drawn line to make 2 Half Square Triangles from each set (total of 4 HSTs).


Step 6: Press seams to the dark fabric.


Step 7: Square the end of the strip and then cut (4) 2-1/2" squares.


(Make sure that when you measure to make the 2-1/2" squares seam centered on the ruler.)

Step 8: Square up the HSTs.


Step 9: Layout all of the squares in their correct spots according to the pattern.


Step 10: Sew the rows together and press seams toward the red (darker fabric).


Step 11:  Sew rows together and press seams toward the red (darker fabric).


This is a super easy block. It took me maybe 30 mins to make (including time it took to take photos and get my kids stuff). This could also be easily made into a signature block too!

Happy Sewing!

Tuesday, September 6, 2011

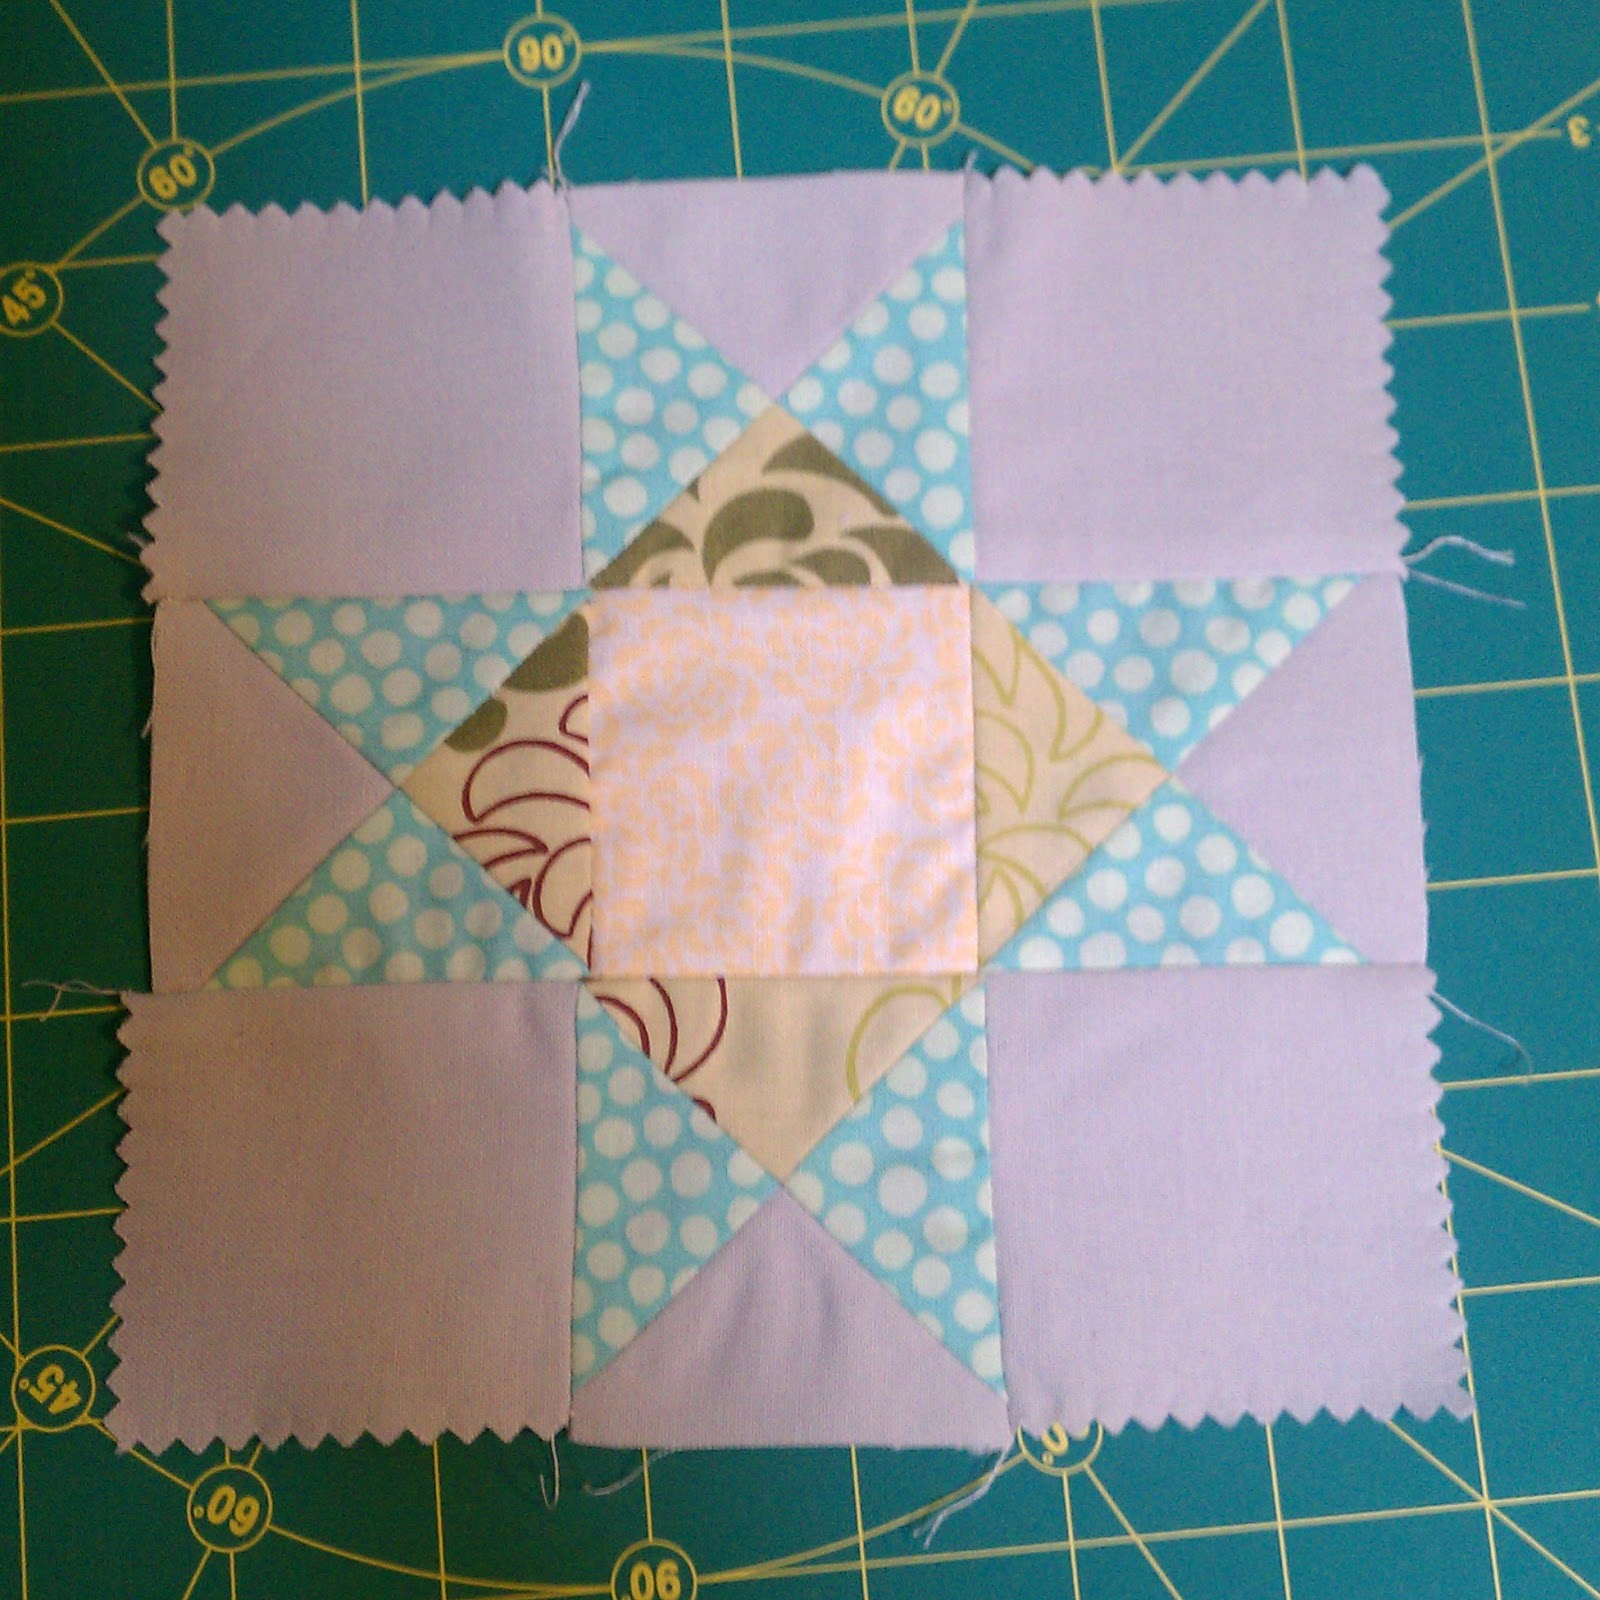
Ohio Star Signature block

I got to thinking that with all the swaps that we do, we've never talked about doing signature blocks before. It was on my mind lately, so I decided to take one of the traditional quilt blocks and show how you can convert it into a signature block. I also had fun and played with color placement. Fun right???

A 6 inch finished block is great for scraps too!!

What you'll need:
* Fabrics: grey, blue, yellow or orange, and green.
* sewing machine
* 1/4" foot (optional)
* neutral thread
* rotary cutter and mat
* Acrylic ruler
* chalk pencil (or other non-permanent fabric marking pen/pencil)
* Pigma fabric pen (for signature)

Fabric Cutting:
* Grey fabric (outer border): (1) 3-1/4" x 3-1/4" square and (4) 2-1/2" x 2-1/2" squares
* Blue fabric (star points): (2) 3-1/4" x 3-1/4" squares
* Green fabric (inner border): (1) 3-1/4" x 3-1/4" square
*Yellow or Orange fabric (inner square): (1) 2-1/2" x 2-1/2" square


(I used scraps from a leftover charm pack and some Kona Ash as the grey.)


Assembly:
Now comes the fun part! Let's sew this block together! I'm going to give you a tip on how to make a Quarter Square Triangle (QST) without cutting individual triangles! Everyone loves a shortcut right???

Take your 3-1/4" squares of blue fabric and draw a diagonal line through it. Then pair one blue square with the matching green fabric 3-1/4" square and the other blue square with the grey 3-1/4" square.

(It's kinda hard to see my lines.)

Using either your 1/4" foot or a 1/4" line on your machine, sew 1/4" on both sides of the drawn line. Do not sew on you line because we are going to cut there. After you've sewn your two seams, cut on the center line that you drew.

(Your squares should look like this.)

Press to the darker side (in this case, I pressed towards my blue fabric). Now, take one Grey/Blue square and match it with one Green/Blue square right sides together where the blue is on opposite sides.


(It should look like this.)

Now we are going to do the same. Draw a diagonal line perpendicular to the sewn line.


(Like this. Notice the dog ears? When we pressed to the blue side of each triangle it allowed for the pressed seam to be opposite of each other when they are matched. This allows for less bulk in your seam.)

Again, we are going to sew 1/4" away from each side of the drawn line. Once sewn together, we are going to cut down the center and press to the darker side.


Now we are going to square up our QSTs to make them 2-1/2" squares. This will cut off dog ears and the excess fabric (sometimes pressing or not exact 1/4" seams will make your squares a tad off).

(I have a 2-1/2" square acrylic ruler that comes in handy when working with small blocks or pieces.)

Now we are going to lay out our pieces to where they go and play with the the arrangement of colors.


Now to sew the block together. I always work top to bottom and left to right. Sew your squares together to make 3 rows. Press the seams toward the center block in the top and bottom rows. Press the seam away from the center in the center row.


Sew your rows together. Press the seams away from the center.


Now that your block is finished, it's time to sign the center block. Using your Pigma pen, put the info in the center. On this one, I put my name at top and "Misfit Quilters" and the state I live and year the block was made on the bottom. You can sign the block however you wish, just follow the swap instructions.

Tuesday, July 12, 2011

Farmer's Wife QAL Broken Dishes Cheat (can be used with other blocks too)

Ok I'm not sure about you all, but I really don't want to cut out my pieces individually nor do I want to make all those templates.

First off here is a little cheat you can use to measure your templates.

1. Grab a ruler. I am using a 4.5 inch square with a 45 degree diagonal line through it. On some of the templates, you'll need a ruler that measures to the 1/16th of an inch.

2. Place the ruler over your template. When I first measured my templates I only measured one side of the triangles and "guessed" where the corners were shaped. That would be WRONG! Sadly I measured about half of the templates before I realized this. The picture below shows how to place your ruler. You want to place the edge of the ruler along one short side of your triangle and line up the 45 degree line with the longer diagonal line. The size of your Half Square Triangle (HST) will be where the bottom line hits. In this case, it will be a 2-3/8 inch HST.


Now for the cheat for the Broken Dishes block.

1. Measurements for HST. Find and measure the template (which will be the one we did above). Remember 2 HSTs equal 1 square (so if it calls for 16 HSTs, you will need 8 squares).

2. Cut out your squares. DON'T cut them into triangles yet!

3. Draw lines. Take one color stack of squares and draw a 45 degree diagonal line on one side of them.

4. Sew the Squares. You will sew the squares twice. Using the line you drew, sew 1/4" on each side of it. (see picture below).


5. Cut triangles apart. Cut down the line that you drew. (see picture above)

6. Press triangles.

7. Trim those dog ears. Using your ruler. place the diagonal line against the seam and make sure you also have even lines. This square will happen to be a 2 inch square. It is very important that you make sure that when you do this that you pay attention to not trim too much off. Do your math! There will be 4 of these in a row (which will equal 8 inches) minus the seams (1/2 inch per seam would equal 1-1/2 inches) and your finished measurement would be 6-1/2 inches.


8. Lay out design. Lay out the pieces on your cutting table as they are in the pattern.


9. Sew block together. Remember to pay attention to where the seam should be and line up those seams!


*You can lay your pieces right sides together and folder over 1/4 inch to see if the seam will line up.


*When I have more than one seam to line up I use pins to hold the seams together while I work on the others and when I sew it.
*Ta Da :-)

*Press seams to the darker fabric side. When lining up 2 sets, press seams in opposite directions so that there isn't one big bulge.


10. After you've finished your block, make sure that it is 6-1/2 inches square. If you need to, trim off extra, but find the center line and work from there that way your block will be centered when you put your quilt top together.


Friday, March 25, 2011

Invisible Zipper Tip

Today I learned a tip to putting in an invisible zipper. I was at Hancock Fabrics today looking for a few extras I needed to finish a couple dresses for my girls. I asked about Wonder Tape (a tip I heard about on #talknt for putting zippers in). She told me they didn't sale it, but her grandmother (who could look at a Vogue pattern picture and then draw/cut out the pattern out without opening the package...) used this method all the time.

What you need:
  1. fabric
  2. zipper
  3. masking tape
  4. basic sewing supplies
  5. Alchohol and q-tips (to clean adhesive off the needle)


For those who don't know, masking tape is similar to painters tape. My dad always had drafting tape (which isn't as "sticky") around that we played with when he was drawing up house plans.

  1. You take the edges of the fabric and put them together. I would suggest ironing down the seam allowance and aligning the folds together. Tape the fabric on the side that would be showing (or the top/outside of the seam).
  2. Then you lay your zipper along the inside where your seam allowance is and tape the zipper down on both sides.
  3. Now, you draw on the tape where you want to sew. This way there is no guess work.
  4. Sew along the lines. Using the alcohol to clean the adheasive off of the needle as needed.
  5. The masking tape will be perforated at this point. Simply remove the tape and voila you have an invisible zipper.
Now if you are doing a bag and there will be a lining, my suggestion would be to do a basting stitch to hold the first fabric in place and then remove the tape from the zipper and then repeat step #1 with your lining fabric and lay that over the basted on zipper. Possible leaving a little gap between the lining fabric so that there isn't any fabric to snag the zipper on. I will have to test that out and get back to you on it. I will also post pictures tomorrow for the different steps.


I can't seem to find it right now, but I found a tutorial last month where she showed how to do an invisible zipper for a pillow. In the tutorial, she basted the two pieces of fabric together and then ironed them opposite each other. She then pinned the zipper on the basted seam and sewed it on. Removed the basted thread and you had an invisible zipper. I'll keep trying to find it.


Here is a different invisible zipper tutorial from Stitched In Color.